How to get started - SimpleInvoices
- Charles Bergeron (Unlicensed)
- dorcas.chak@maestrano.com (Unlicensed)
- Alex Barret (Unlicensed)
SimpleInvoices is an intuitive application to generate, manage and track invoices. Simple invoices is ideal to create professional looking invoices that can be sent to your customers in PDF format. The invoices generated can be total invoices or itemised invoices for construction and progress accounts and can be imported in MS Word, Excel or plain text.
The application also provides templates and invoice preferences, as well as Paypal payment gateway support and EWay Merchant Hosted payment gateway support. Simple invoices also offers the possibility to track payments and monitor customers accounts as well as generating reports by customers, products, taxes and more.
1 - Getting started with SimpleInvoices on Maestrano
To get started with SimpleInvoices, you must first be registered on Maestrano and logged in your Maestrano account.
CLICK HERE TO GET STARTED WITH SIMPLEINVOICES ON MAESTRANO
Once your application is installed on your dashboard, click on it to be automatically and securely logged in. Your SimpleInvoices application is ready to use !
NOTE: As part of your Maestrano setup, you benefit from our unique Single Sign-on security feature. All your identification information (Login username and password and email address) are directly linked to your Maestrano account and you do not need to change/edit/modify them in your application.
2 - Setting up the parameters of SimpleInvoices
By Clicking on Settings in the upper part of the application, you will be able to setup the parameters of the application. This includes changing/adding mark-ups to your quotes (e.g. GST, VAT, freigth, etc.) and the currency for the invoices.
To modify the mark-ups, simply click on the sub-menu Tax Rates and modify or add the values you need.
To modify the currency of the invoices, go to Invoice Preferences. You will see a table with Invoices, Quotes, Estimates, Receipts. By clicking on Edit for any of them, you will see the following screen appearing :
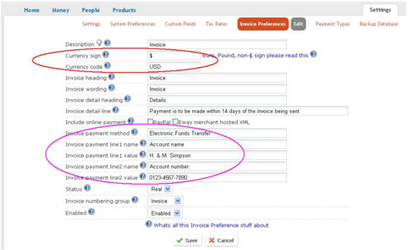
This is where you can chose to modify the currency of your invoices (Red circle).
This screen is also where you will be able to customize the payment method, account numbers appearing on your invoices and include online payment should you wish to (Purple circle).
3 - Creating a Biller and a Customer in Simpleinvoices
You have two options to create a biller/customer in simpleinvoices. After you first login, you can go back to the home page by clicking on the tab Home and follow the instructions of the application. For all subsequent times, you will need to go back to People and click on the item Billers or Customers in the sub-menu.
Once you have clicked on Add a new Biller, you will be required to fill in the form associated to the biller account. The same process has to be followed to create a new customer, in the Customers tab.
4 - Creating the products/services to invoice in SimpleInvoices
You now need to create the list of the products or services that you will have to invoice. For this, go to the Products tab and click on Add a new Product. Note that the currency's choice is dependent on the settings of your application as explained above, so is the amount of GST, VAT, etc.
5 - Reports and accounts tracking in SimpleInvoices
You are now ready to invoice your customers for the appropriate products. To create a new invoice, simply go back to the home page and follow the instructions.
You can export your invoices in various standard formats.
On the home page, by clicking on All reports in the sub-menu, you will be able to track the status of all your accounts, debtors, outstanding payments, etc. You can also view reports on your product sales, biller sales and taxes.
Once an invoice is paid, you will need to close it to acknowledge payment and close the debtor's line. To do so, go on the tab Money and click on the sub-menu item Payments. In there, you will see a summary of the existing past payments you received and will be able to record a new payment received. To do so, click on Process Payment as per figure below.
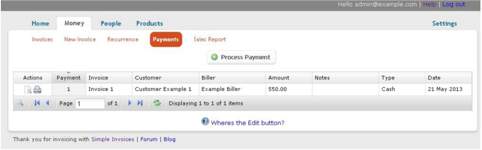
Fill in the field required by the application after having selected the outstanding invoice. Note that Simpleinvoices allows for the recording of multiple staged payments for a given invoice.
Once you have completed this, all the reports in the application will be automatically updated to reflect the closing or payment-progress of the invoice.
6 - Using Simpleinvoices
You are now completely setup to use SimpleInvoices. This application is very user-friendly and quite easy to use. Once you have setup your company, products and customers, invoicing will become the easy part for your business.
Note that all the reports generated by the application can help with the evaluation of your sales, orders and cash position.
Simpleinvoices can also generate quotes, estimates and receipts. The process is the same as to create an invoice. Simply select the right type of document you want to produce when creating a new one.
Related content
Any question? Contact us on support@maestrano.com