How to get Started - OrangeHRM
- Charles Bergeron (Unlicensed)
- dorcas.chak@maestrano.com (Unlicensed)
- Alex Barret (Unlicensed)
Orange HRM is a precise and convenient HR Management (HRM) system targeted for Small and Medium Enterprises. The functionality includes employee information management, employee absence management, recruitment management, employee performance evaluation, leaves management, reporting lines management and many other HR management tools. Orange HRM also provides Expense tracker, timesheets, leave calendar, notifications and exports to Microsoft Excel (CSV extractor) for reports, leave and recruitment details.
1 - Getting started with OrangeHRM
To get started with OrangeHRM, you must first be registered on Maestrano and logged in your Maestrano account.
CLICK HERE TO GET STARTED WITH ORANGEHRM ON MAESTRANO
Once your application is installed on your dashboard, click on it to be automatically and securely logged in. Your OrangeHRM application is ready to use!
NOTE: As part of your Maestrano setup, you benefit from our unique Single Sign-on security feature. All your identification information (Login username and password and email address) are directly linked to your Maestrano account and you do not need to change/edit/modify them in your application.
2 - Set up your organisation in OrangeHRM
To set up your organisation, click on Admin in the control panel and on the first menu item Organization. You will be able to enter all the details related to your organisation.
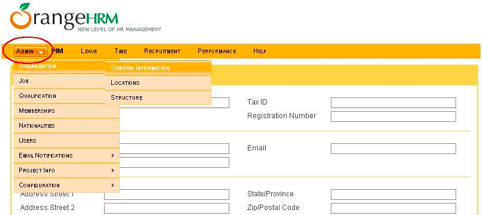
Note that you will be able to enter the location or locations of your company in this section. The locations will be used when you enter your employees as part of their profiles.
You can also specify your company's structure should your organisation be divided in sub-divisions or sub-sections. This again will be used in other parts of the application later on.
3 - Adding Employees and Users in OrangeHRM
Tips for adding users to OrangeHRM on Maestrano: You want to know the simplest and most secure way to add users to your OrangeHRM application [recommended]? Simply share your OrangeHRM app with the users you need through your Maestrano dashboard. It's a 1-minute process, that will make you create an 'Organization' (The group of users you want to grant access to your application) and invite those users you want. Follow this very short guide and you will be done in 1 minute.
The users will automatically receive an invitation email to access OrangeHRM.
If you want to add users/employees directly from the OrangeHRM application [not recommended], click on PIM in the control panel. This tab is generally where you can enter all information related to your human resources. By clicking on Add Employee you will be able to enter all employees details.
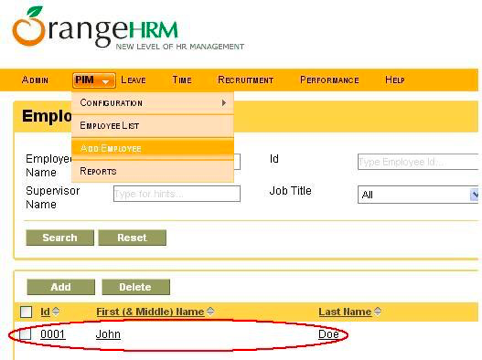
Once saved, your employee appears in the list, as highlighted in red on the figure above. By clicking on the employee's name, you will see his/her full profile appearing.
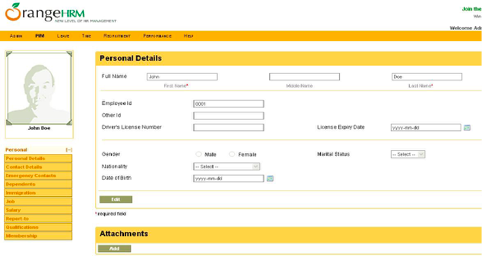
You can now complete their profile with all the information you need.
2 Important Notes:
In the Report-to tab, you will be able to assign a supervisor to your employee. You will not be able to complete this action if the supervisor is not entered in the employee list him/herself as the selection is made from a drop-down list with the names of the employees entered in your data base.
By going in the Job tab, you will be able to specify the function of your employee, as well as the job category, sub-unit and location. Those items are also populated from drop-down lists based on information you have provided in another section of the application. The location and sub-division information has been provided when you competed your organisation setup in the Application (See first point of this tutorial). See below how to setup the jobs.
IMPORTANT NOTE for creating users:
When creating a user, you will be required to allocate a name (username) and password. You do not need to communicate these credentials to your users as the Maestrano Single Sign-on security feature will take care of it from their Maestrano account.
It is however important that you enter for each user a valid email address (So that they can receive the application's notifications). This email address should be the same as the one they registered on their Maestrano account, to ensure that the users can actually access your OrangeHRM application. All users will need to create an account on Maestrano, using the same email address as the one entered in the OrangeHRM application.
4 - Set up the various jobs existing in your company
In order to create the list of jobs available in your organisation (And be able to allocate those jobs to your employees as seen above), go to Admin in the control panel and click on the second menu item Job. In the sub-menu that appeared, click on Job Titles. By clicking on the button Add, you will be able to enter a new job in the window displayed below.
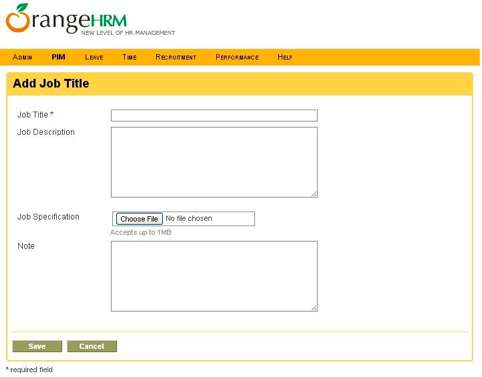
Note that you can import an existing Job Description and it can be the same one as the one used in the "Recruitment" section of the application.
Once Saved, the job is entered in the data base and can be used as part of your reports and to be allocated to your employees.
5 - Advanced functionnalities of Orange HRM
You have now setup the basic elements of Orange HRM: your company (Including location and structure), your employees list, their jobs and associated information.
Orange HRM proposes much more practical functions, among others:
- Leaves tracking
- Timesheets tracking
- Recruitment process assistance and follow up
- Setup and monitoring of Key Performance Indicators (KPIs) for your workforce
- Annual discussions recording and tracking
- Those more advanced functions will be described in another tutorial (Coming soon!), but Orange HRM is a transparent application that always follows the same process: establish the parameters required by the application (Like you did for your company setup, jobs, etc.) and follow the flow of requirements prompted by the application.
Related content
Any question? Contact us on support@maestrano.com