Nex!™ Azure Deployment
This wiki page provides step by step instructions on how to manually setup the Nex!™ Platform as a Service (PaaS) on a brand new Azure account.
1 - Create Azure account
Create gmail address: maestrano.<project-name>@gmail.com
Create Azure account: maestrano.<project-name>@gmail.com
You can follow this guide for the Azure account creation.
2 - Get your Azure API keys
The steps below are required to obtain your Azure API keys for the UAT environment. You can repeat these steps for production.
- Search for "App registrations" in the Azure search bar
- Enter a name for the registration. E.g. nex-uat (nex-prd for production)
- Enter a URL for the service. E.g. expected Nex!™ UAT URL
- Copy the Application ID - this is the Azure Client ID
- Go the newly created App Registration and search for the "Keys" section
- Enter a description and set to "never expires"
- Click on "save"
- Copy the application key- this is the Azure Client Secret
- Search for "Active Directory" in the Azure search bar
- Go to properties
- Copy the Directory ID. This is the Azure Tenant ID.
- Search for "Subscriptions" in the Azure search bar
- Click on the default subscription ("Free Trial" or "Pay as you go"). If no subscription exists yet, Add a plan and select "Pay as you go".
- Go to "Resource Groups"
- Create a new resource group attached to this subscription called nex-grid-uat (nex-grid-prd for production). Copy the name. This is the Azure Resource Group.
- Click on the newly created resource group
- Click on Access Control
- Click on "Add", select "Owner" as a role and enter the name of the app registration you created previously (e.g. nex-uat). This action will give permissions to the API Key to manage the resource group.
- Go back to Overview
- Copy the Subscription ID. This is the Azure Subscription ID.
The five values you have copied above are required by the Nex!™ Orchestrator. They must be setup as environment variables in the application.yml file:
AZURE_RESOURCE_GROUP: the name of the resource group. This is specific to each environment (e.g. nex-grid-uat)
AZURE_TENANT_ID: the active directory ID (owner). This is common to UAT and Production.
AZURE_SUBSCRIPTION_ID: the id of the billing subscription. This is usually common to UAT and Production.
AZURE_CLIENT_ID: the app registration "application id". This is specific to each environment.
AZURE_CLIENT_SECRET: the app registration "key secret". This is specific to each environment.
3 - Setup the grid infrastructure
The following steps describe how to prepare the "grid" infrastructure - that is setting up the networks, security groups, load balancers and IP addresses required by the routing, compute and storage tiers managed by Nex!™. These steps DO NOT describe how to deploy the Nex!™ orchestrator itself (see the next section for this).
Repeat the following steps for each environment and each region you deploy to. Use a sensible naming convention to identify the environments. e.g.
- nex-grid-uat-ae: identifies a UAT resource in the Australia east region
- nex-grid-prd-sea-elb: identifies a Production load balancer in the South East Asia region.
- nex-grid-prd-sea-sg-compute: identifies a Production security group for the compute tier in the South East Asia region.
3.1 - Networks
- From the left menu panel select Virtual Networks (/!\ do not use the 'classic' version).
- Click Add
- Choose a sensible name. E.g. nex-grid-uat-sea-vnet (UAT / South East Asia / Virtual Network)
- Choose a /16 network. E.g. 10.0.0.0/16 for UAT and 10.50.0.0/16 for production. Increment the second number for multi-environments (eg: 10.1.0.0/16 for UAT, 10.51.0.0/16 for production)
- Attach the network to the right resource group (UAT or Production)
- Select the right location (Southeast Asia in the example above)
3.2 - Network Subnets
- Select the previously created network (e.g. nex-grid-uat-sea-vnet)
- Under it go to Subnets
- Delete the "default" subnet if one exists
Create the following four subnets. Adapt the IP range based on the IP range of the Virtual Network
Name Range tier1-public 10.0.0.0/24 tier2-routing 10.0.1.0/24 tier3-compute 10.0.2.0/23 tier4-storage 10.0.128.0/23
3.3 - Security Groups
- From the left menu panel select More services then search for Network Security Groups (/!\ do not use the 'classic' version).
Create the following four security groups along with their Inbound Security Rules. Adapt naming, resource group and location based on the environment and region. Adapt source range based on virtual network IP range.
NOTE: rules below are grouped per "use type" and may therefore overlap on each other. This is intended and aims at better anticipating future changes on source ranges due to stricter security requirements.Security Group Rule Name Source Destination Port nex-grid-uat-sea-sg-compute SSH Any Any 22 HTTP Any Any 80 HTTPS Any Any 443 Internal-sea 10.0.0.0/16 Any 1024-65535 nex-grid-uat-sea-sg-nat SSH Any Any 22 Internal-sea 10.0.0.0/16 Any * nex-grid-uat-sea-sg-routing SSH Any Any 22 HTTP Any Any 80 HTTPS Any Any 443 nex-grid-uat-sea-sg-storage SSH Any Any 22 Rsync-sea 10.0.0.0/16 Any 873
3.4 - Load Balancer
Repeat the following steps for each environment and region
- From the left menu select Load Balancer
- Create a new load balancer.
- Adapt the name based on region and environment (e.g. nex-grid-uat-sea-elb)
- Choose "public" for the load balancer type
- Attach a dynamic IP to it with a name related to the load balancer name (e.g. nex-grid-uat-sea-elb-ip)
- Set the Resource group to the existing one (UAT or production)
- Set the region accordingly
- Save your load balancer
- Select your load balancer
- Go to Health Probes under it
Add a health probe with a consistent name (e.g. nex-grid-uat-sea-elb-probe)
Name Protocol Port Path nex-grid-uat-sea-elb-probe HTTP 80 /_mno_healthcheck_ping Go to Backend Pool
Create a new backend pool with a consistent name (e.g. nex-grid-uat-sea-elb-pool). Leave it "unassociated".
Go to Load Balancing Rules under your load balancer
Add the following load balancing rules
Name Port Backend Port Backend Pool Probe nex-grid-uat-sea-elb-rule-http 80 80 nex-grid-uat-sea-elb-pool nex-grid-uat-sea-elb-probe nex-grid-uat-sea-elb-rule-https 443 443 nex-grid-uat-sea-elb-pool nex-grid-uat-sea-elb-probe - Go to IP Addresses and search for the ip you created along with the load balancer (e.g. nex-grid-uat-sea-elb-ip)
- Go to Configuration
- Choose a friendly label to uniquely identify this load balancer. This label will be used to generate the load balancer DNS (see full URL under the input field).
Example: nex-grid-uat-sea-elb-<project-name>
Full example: a label nex-grid-uat-sea-elb-nexmin for an IP address in Southeast Asia will generate the following DNS: nex-grid-uat-sea-elb-nexmin.southeastasia.cloudapp.azure.com
3.5 - Gateway/NAT static IP address
Incoming SSH traffic and outgoing traffic to/from the virtual network require a static IP address. This static IP address must be provisioned through Azure and then entered as a configuration parameter in the Nex!™ configuration (see section 4.2).
To provision a static IP address in Azure follow the steps below:
- From the left menu select More Services then Public IP Addresses
- Click Add
- Adapt the name based on region and environment (e.g. nex-grid-uat-sea-nat-ip)
- Select static for the type of IP
- You do not have to enter a DNS label
- Attach the IP address to the relevant resource group and select the relevant location
- Click on create
- Wait for Azure to provision the new IP address
3.6 - DNS & SSL Setup
3.6.1 - Corporate DNS
After setting up the Load Balancer DNS above you should setup a wildcard DNS from your own domain to this Load Balancer DNS.
To do so login to your DNS manager portal (e.g. Azure DNS, AWS Route53, GoDaddy etc.) and create the following record. The name of the record should be adapted on your URL branding requirements.
| DNS Entry | Type | Value |
|---|---|---|
| *.uat.nexmin.maestrano.io (example for a maestrano domain related to a "nexmin" project in UAT) | CNAME | nex-grid-uat-sea-elb-nexmin.southeastasia.cloudapp.azure.com (example of load balancer DNS generated by Azure) |
3.6.2 - Default SSL Certificate
After setting up the domain above you should purchase a wildcard SSL certificate and configure on Nex!™ to be used by default. The two environment variables to set in Nex!™ are described below:
ssl_cert_key_cube_default: certificate private key
ssl_cert_chained_cube_default: concatenation of certificate public key + certificate bundle from Certificate Authority (CA)
4 - Nex!™ Orchestrator Deployment
The following steps describe how to deploy the Nex!™ Orchestrator application on Azure. The steps must be repeated for UAT and Production.
4.1 - Prepare the orchestrator dependencies.
For the purpose of keeping components isolated the Nex!™ orchestrator will be deployed in a separate virtual network. Separating virtual networks avoids conflicts and/or diverging interests inside the virtual network security structure.
While the whole network / server / security group deployment is automated through an Azure deploy script in mno-deploy, deployments of the MySQL database and Redis instance are not and must be configured separately.
Several options are available for this (Azure services, external deployment, internal deployment) . The steps below make use of Azure-provided services.
4.1.1 - MySQL deployment
Server deployment:
- From the left panel go to More Services then search for MySQL
- Select Azure Database for MySQL
- Add a new Database and enter a globally unique name describing the resource, region, environment and project. E.g. nex-orchestrator-uat-sea-db-nexmin
- Set the admin username to azure_root and generate a random password. Note that the admin username must not match with a built-in MySQL user (e.g. root).
- Attach the resource to the resource group corresponding to the environment your are targeting (e.g. nex-grid-uat)
- Select the location corresponding to the location the infrastructure has been deployed to (e.g. Southeast Asia)
- Save the resource and wait for Azure to deploy it
- Go to the resource under Connection Security and disable SSL ACTION NEEDED
- Still under Connection Security add a connectivity rule for all traffic (0.0.0.0 to 255.255.255.255) ACTION NEEDED
Database creation
- Allow your IP to connect on the MySQL server
Connect to the MySQL server you just created (you need the mysql client installed locally)
# Note that the username must be suffixed with the Azure db server name
mysql -u azure_root@nex-orchestrator-uat-sea-db-nexmin -h nex-orchestrator-uat-sea-db-nexmin.mysql.database.azure.com -p
Create the database (e.g. nex_uat) along with its full privilege user (e.g. nex_uat as well)
-- Adjust the name of the user and database accordingly
-- /!\ Make sure to change the user password
CREATE DATABASE nex_uat;
GRANT ALL PRIVILEGES on nex_uat.* to 'nex_uat'@'%' identified by "some-password";
FLUSH PRIVILEGES;

exit
Check that the newly created user is able to access its database
# Note that here again the newly created username must be suffixed with the Azure db server name
mysql -u nex_uat@nex-orchestrator-uat-sea-db-nexmin -h nex-orchestrator-uat-sea-db-nexmin.mysql.database.azure.com -p -D nex_uat
- Disconnect and remove your IP from the list of accepted connections (if added previously)
4.1.2 - Redis deployment
- From the left panel go to More Services then search for Redis
- Select Redis Caches
- Enter a globally unique name describing the resource, region, environment and project. E.g. nex-orchestrator-uat-sea-redis-nexmin
- Attach the resource to the resource group corresponding to the environment your are targeting (e.g. nex-grid-uat)
- Select the location corresponding to the location the infrastructure has been deployed to (e.g. Southeast Asia)
- Tick the "Unblock port 6379" ACTION NEEDED
- Save the resource and wait for Azure to deploy it
4.2 - Prepare the Nex!™ configuration
The Nex!™ orchestrator configuration activities are done through Ansible. In order to get started you must setup a configuration repository on Github (e.g. mno-deploy-nexmin) and a continuous build to deploy this configuration package to a dedicated private bucket on AWS S3.
The mno-deploy Github repository provides more details on how to do this.
4.2.1 - Configuration
The Nex!™ orchestrator configuration is driven by three files:
| File | Example | Description |
|---|---|---|
| ansible/files/nex/<project>/<env>/settings.yml | ansible/files/nex/nexmin/uat/settings.yml | This file describes the general behaviour of Nex!™ and the infrastructure to manage |
| ansible/vars/<project>_<env>.yml | ansible/vars/nexmin_uat.yml | This file describe high level details related to infrastructure |
| ansible/vars/<project>_<env>_secrets.yml | ansible/vars/nexmin_uat_secrets.yml | This files contains all secrets and is used to generate the Rails application.yml file. This file must be encrypted using Ansible Vault. |
A full configuration example can be found on our mno-deploy-nexmin Github repository. This repository can be used as boilerplate to setup your own configuration repository.
4.2.2 - Deployment to S3
Once your configuration repository is ready you should package it as a .tar.gz archive and publish it to AWS S3 (support for other buckets will come later on). This packaging activity should be done through a continuous integration service such as Codeship (or Jenkins).
Details on the location of the configuration package as well AWS credentials will be required for the next step (orchestrator deployment).
4.3 - Deploy the Nex!™ orchestrator
The mno-deploy repository provides a "Deploy to Azure" link to seamlessly setup and deploy the Nex!™ orchestrator. This deployment link creates a new virtual network inside Azure, a load balancer and a machine configured with startup scripts to deploy the Nex!™ orchestrator based on the configuration provided in the previous section.
4.3.1 - Service Deployment
To deploy the service follow the steps below:
- Ensure you are logged into your Azure portal
- Go to: https://github.com/maestrano/mno-deploy/tree/develop/azure/nex
- Click on Deploy to Azure
- Azure will display a screen with various configuration details to fill or edit. It is on this screen that you provide details related to where your configuration package is located and which credentials should be used.
- Choose the resource group matching your environment
- Choose a VM name based on your location, project name and environment. E.g. nex-orchestrator-uat-sea
- Choose a /24 network mask. E.g. 192.168.0.0/24 for UAT and 192.168.50.0/24 for production
- Enter a public SSH key to setup on the machine for the first user
- Choose a globally unique public DNS name for the load balancer which identifies the environment, region and project. E.g. nex-orchestrator-uat-sea-elb-nexmin
- Enter the AWS S3 keys that were provided to you to download the Maestrano packages and Configuration repository.
- Specify the name of your configuration bucket. This name must match with a AWS S3 bucket. E.g. mno-deploy-nexmin
- Enter the configuration branch. For a production deployment leave it to master. For a UAT deployment you point it to develop (you must create a develop branch on your configuration repository)
- Choose the configuration environment. The name of the environment is <project>_<env>. E.g. nexmin_uat or nexmin_prd. The name of the environment MUST match the name of one of your Ansible configuration files in your configuration repository. See examples in our mno-deploy-nexmin example project.
- Click on Deploy
- Wait for Azure to provision the whole service
4.3.2 - DNS Setup
After Azure has deployed the service you should configure a friendly DNS to point to the Nex!™ orchestrator load balancer - in a similar fashion to what you have done previously for the wildcard domain pointing to the Nex!™ grid.
To do so login to your DNS manager portal (e.g. Azure DNS, AWS Route53, GoDaddy etc.) and create the following record. The name of the record should be adapted on your URL branding requirements.
| DNS Entry | Type | Value |
|---|---|---|
| api-nex.uat.nexmin.maestrano.io (example for a maestrano domain related to a "nexmin" project in UAT) | CNAME | nex-orchestrator-uat-sea-elb-nexmin.southeastasia.cloudapp.azure.com (example of load balancer DNS generated by Azure during service deployment) |
4.3.3 - SSH Access
Accessing the first Nex!™ orchestrator machine via SSH:
- Go to the Azure portal
- Search for the Nex!™ orchestrator load balancer
- Go to the Inbound NAT rules section
- Add a rule to forward traffic port 5000 to port 22 (SSH)
Access the machine with the following command
# Adjust the hostname below based on the DNS settings you have configured above
ssh -i path/to/ssh/private/key ubuntu@api-nex.uat.nexmin.maestrano.io -p 5000
NAT rule should already exist
The NAT rule above should have already been setup when you inspect the load balancer as it is part of the "Deploy to Azure" deployment script.
This section is provided for informational purpose to explain how machines behind a load balancer are initially accessed through SSH.
4.3.4 - Checking the initial deployment
As a first step you should display the ansible logs:
cat /var/log/ansible.log
It may happen that the first Ansible run after boot fails - in this case simply rerun the Ansible script
sudo bash /opt/maestrano/redeploy.sh
The first full Ansible run may fail because the database is not yet seeded. After the first Ansible run do the following:
# Navigate to the Rails application folder
cd /app/nex/current


# Load the database schema manually
# Adjust the environment name - uat or production
# IMPORTANT: this step should only be done ONCE when you setup the Nex! orchestrator the first time
RAILS_ENV=production DISABLE_DATABASE_ENVIRONMENT_CHECK=1 bundle exec rake db:schema:load
After this you can rerun the Ansible script to finalise the setup:
sudo bash /opt/maestrano/redeploy.sh
You can now tail the orchestrator logs:
tail -f /app/nex/current/log/*.log
5 - Break
5.1 - Road travelled so far
Let's hit the pause button and summarise the road we've travelled so far:
- A brand new Azure account has been created (section 1)
- A Resource group has been setup to differentiate the environments (UAT, Production) (section 2)
- API Keys have been generated on Azure for the Nex!™ Orchestrator to be able to manage infrastructure resources inside a resource group (section 2)
- The base network resources (network, security groups, load balancer) required by Nex!™ to provision hosting servers have been created (section 3)
- The database and cache instance required to deploy the Nex!™ Orchestrator/API have been created (section 4)
- The Nex!™ Orchestrator/API (Web Service) has been deployed inside a dedicated network (section 4)
5.2 - What functionalities are available?
What functionalities are available at this stage:
- The Nex!™ Orchestrator is up and running which means:
- You can access the Nex!™ orchestrator via its URL. After signing in via Github it will give you an API token to query the API.
- You can query the API using the nex-cli command line tool (provided as part of the nex_client gem)
- A resource group has been created in Azure and the Nex!™ Orchestrator has been configured to manage it which means
- Servers can be provisioned by the Nex!™ orchestrator inside the resource group
5.2 - What is missing?
So we have the core infrastructure running but the deployment is not completely over:
- The resource group is currently an empty shell which is only composed of a network, a set of security groups and a load balancer
- We need to instruct the Nex!™ orchestrator to provision servers inside the resource group to manage:
- SSH access and outgoing traffic: we need a Gateway Rack
- Incoming web traffic: we need Routing Racks
- Application Docker containers: we need Compute Racks
- Hosting of backup files: we need Storage Racks
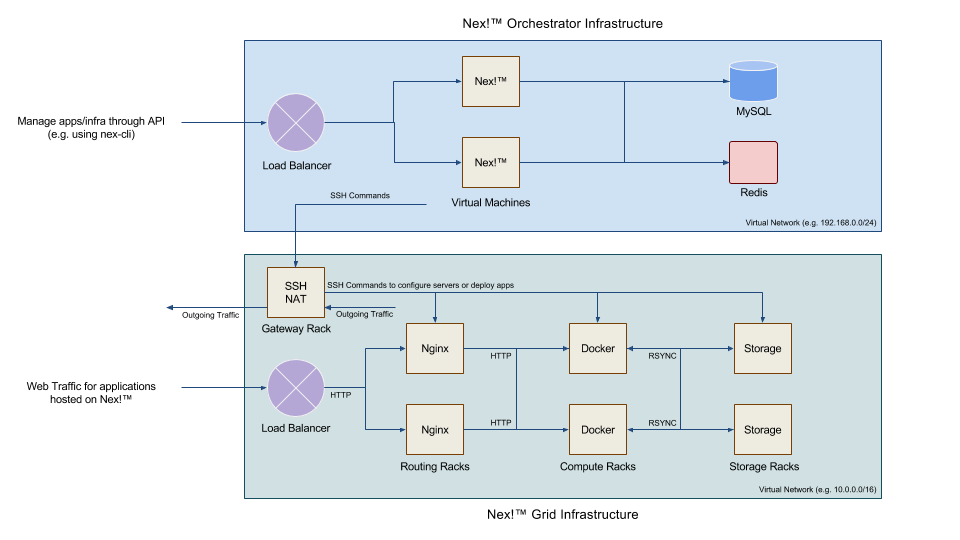
You don't really understand what the above means? You should read more about the Nex!™ architecture on this link.
6 - Ramp-up the grid
As explained in section 5 we need to create a few racks/servers to make the Nex!™ infrastructure operational and allow developers to deploy applications through the nex-cli (or the API directly).
6.1 - Access the Nex!™ Orchestrator console
Use the following command to access one of the Nex!™ orchestrator servers via SSH:
# Adjust the hostname below based on the DNS settings you have configured above
ssh -i path/to/ssh/private/key ubuntu@api-nex.uat.nexmin.maestrano.io -p 5000
Then access the rails console:
# Navigate to the orchestrator root path
cd /apps/nex/current

# Fire the console. Adapt the environment: uat or production
bundle exec rails c uat
Before launching new virtual machines, you may need to increase the Azure Account Quotas limit, see paragraph Increasing your account quota
6.2 - Setup a Gateway Rack
In the console enter the following command for each vpc_region:
# Adjust the region based on where the infrastructure is located
r = GatewayRack.create!(vpc_region: "southeastasia", stack: 'nat')

# This will enqueue a background job to provision the actual rack
r.provision!

# Wait for the rack to be "running"
r.reload.status
6.3 - Setup a Routing Rack
In the console enter the following command. For a production setup it is recommended to create two Routing Racks.
# Adjust the region based on where the infrastructure is located
r = RoutingRack.create!(vpc_region: "southeastasia")

# This will enqueue a background job to provision the actual rack
r.provision!

# Wait for the rack to be "running"
r.reload.status
6.4 - Setup a Compute Rack
In the console enter the following command. For a production setup it is recommended to create two Compute Racks.
# Adjust the region based on where the infrastructure is located
r = ComputeRack.create!(vpc_region: "southeastasia")

# This will enqueue a background job to provision the actual rack
r.provision!

# Wait for the rack to be "running"
r.reload.status
6.5 - Setup a Storage Rack
In the console enter the following command.
# Adjust the region based on where the infrastructure is located
r = StorageRack.create!(vpc_region: "southeastasia")

# This will enqueue a background job to provision the actual rack
r.provision!

# Wait for the rack to be "running"
r.reload.status
7 - Post-deploy activities
7.1 - Moving to a paid Azure subscription
If you started with a brand new Azure account it is likely that both resource groups (nex-grid-uat and nex-grid-prd) are still attached to a Free Trial Subscriptions. You can switch this subscription to a paid Pay-as-you-go Subscription by entering a credit card in Azure.
To do so:
- From the top search bar enter Subscriptions
- Click on the Free Trial Subscription
- On the overview panel click on Manage. This action will open the Billing Center in a new tab
- From there you can click on Manage payment methods to add a credit card
- At the end of the process your Free Trial Subscription should become a Pay-as-you-go Subscription
7.2 - Increasing your account quota
It is likely that you will hit your compute quota. You should request Azure to extend your quota through their support centre.
To do so:
- From the top search bar enter Support and access the Help + Support section.
- Click on New Support Request
- Select Quota as an issue type
- Select Cores as a quota type
- Click Next
- For the deployment model, select Resource Manager
- Select the location of your data centre. E.g. Asia Southeast
- Select the SKU family. The Nex!™ platform only make use of FS Series instances by default.
- Choose a new limit (e.g. 60)
- The next screen will ask you for contact information
- Wait for the support request to be resolved. Quota requests are usually resolved within an hour.
7.3 - Security lock-down
COMING SOON
Guidelines on:
- Secure connection to MySQL (SSL)
- Lock MySQL connection to specific IP
- Secure connection to Redis (SSL)
- Lock Redis connection to specific IP