Setup New Relic for Monitoring
- Bruno Chauvet (Unlicensed)
- CamilleCrespeau (Unlicensed)
- Arnaud Lachaume (Unlicensed)
NewRelic allows companies to monitor applications and servers. On the application side it provides analytics on performance and runtime issues. On the server side it provides a performance breakdown of running processes as well as monitor the overall health of servers.

1 - Prerequisite
You need to signup for a NewRelic account at https://newrelic.com/signup and obtain an License Key. NewRelic has a free offer with limited functionalities. Moving to a paying subscription is strongly recommended prior to production rollout.
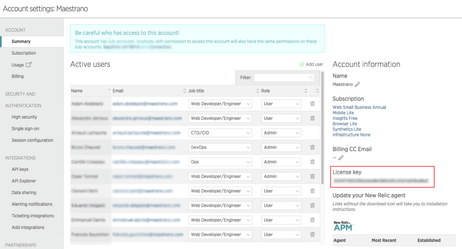
The License Key can be found by clicking at the top right of the screen and selecting Account Settings. The License Key will be located on the right side of the screen.
2 - Configuration using Maestrano Ansible automation scripts
Maestrano Ansible Automation framework already includes modules for NewRelic configuration on applications and servers. All that is required is to add your NewRelic License Key into the Ansible variables.
An example is provided on our github repository on where to put this License Key.
Adding this license key will automatically propagate to all servers and applications configured by the Ansible Automation framework.
Core Products Only
Our Ansible automation framework only covers the deployment of core Maestrano products and does not cover the deployment of application connectors. If hosting application connectors on-premise is required - as opposed to using our cloud connectors - then we recommend using the Maestrano Nex!™ PaaS. See the next section for setting up NewRelic on connectors using the Nex!™ PaaS.
If deploying components manually - including connectors - see section 4 for manual configuration.
3 - Configuration using Maestrano Nex!™ PaaS
The Maestrano Nex!™ PaaS can be used to deploy core applications as well as connector. It provides an out-of-the-box module for NewRelic for server and application monitoring.
3.1 - Server Monitoring
To activate server monitoring it is only required to pass the NewRelic License Key to the Nex!™ configuration when deploying the Nex!™ orchestrator. Upon detecting a NewRelic License Key Nex!™ will automatically install the NewRelic agent on all servers.
To do so edit the config/application.yml when deploying the project or pass the newrelic_license_key environment variable to Nex!™ when starting the application server:
# NewRelic Configuration
newrelic_license_key: somekey
newrelic_app_name: core-nex-production
You will need to restart the nex service if it's already running.
3.2 - Application Monitoring
For application monitoring it is only required to add the newrelic_app_name and newrelic_license_key environment variables to the application on deployment. This can be achieved using the nex-cli tool.
# Add NewRelic configuration
nex-cli apps:vars myapp -a newrelic_app_name=somename,newrelic_license_key=somekey


# Restart the application
nex-cli apps:restart myapp
4 - Manual configuration
If you are deploying the Maestrano components without using any of the patterns above you will want to manually configure NewRelic for servers and applications.
4.1 - Server Monitoring
The NewRelic article below explains how to install the NewRelic Server agent for linux distributions (Ubuntu, RHEL/CentOS etc.)
You will need to add your NewRelic License Key in the NewRelic agent configuration file. This file is usually located at: /etc/newrelic/nrsysmond.cfg
4.2 - Application Monitoring
For each core application and connector you deploy you will need to pass the newrelic_app_name and newrelic_license_key environment variable to the application. You can do this by exporting these environment variables in the application service script (Upstart, Systemd, Init) or by adding these variables into the config/application.yml file of the application:
# NewRelic Configuration
newrelic_license_key: somekey
newrelic_app_name: core-appname-production