Introduction to the developer platform
- Alexandre Jarnoux (Unlicensed)
- CamilleCrespeau (Unlicensed)
- Jye (Unlicensed)
The developer platform's goal is to simplify your application integration with Maestrano and other Maestrano powered marketplaces.
You can create a new app, configure its environments (eg. 'Local, UAT, 'Prod') and to link these environments to marketplaces.
It is also possible to edit your app listings and specialise it per marketplace, to customise the way an app is displayed on a marketplace (logo, screenshots, description, etc.).
1 - Marketing Overview
The Maestrano Developer platform puts the power back in your hands by offering a complete solution to managing your application across the Maestrano and Maestrano Partner marketplaces.
Once your application is integrated, as shown below, you have 2 main functions available to manage your listing.
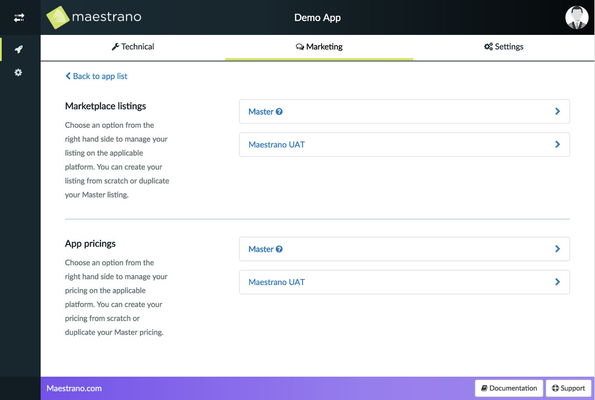
1.1 - Creating a Listing
An application listing can be made through the Developer Platform with a range of options including:
- Logo upload
- App name, description and URL
- Screenshots
- Testimonials/Reviews
Listings can be created for the Maestrano marketplace and partner marketplaces. This can be done once and then duplicated, through our "Master Listing" option for multiple marketplace listing.
1.2 - Controlling Pricing
The developer platform offer the ability for you to control how your application is prices across all marketplaces. As with creating a listing, the pricing option allows you to create a "Master Pricing" module that can be duplicated for multiple marketplaces.
The following pricing customisations are available:
- Free trial
- Note/Descriptions
- Pricing
- Per user
- Per organisation
- Per MB
- Per GB
- And more
Application pricing can be set in multiple currencies and charged at different rates across different marketplaces.
2 - Technical overview
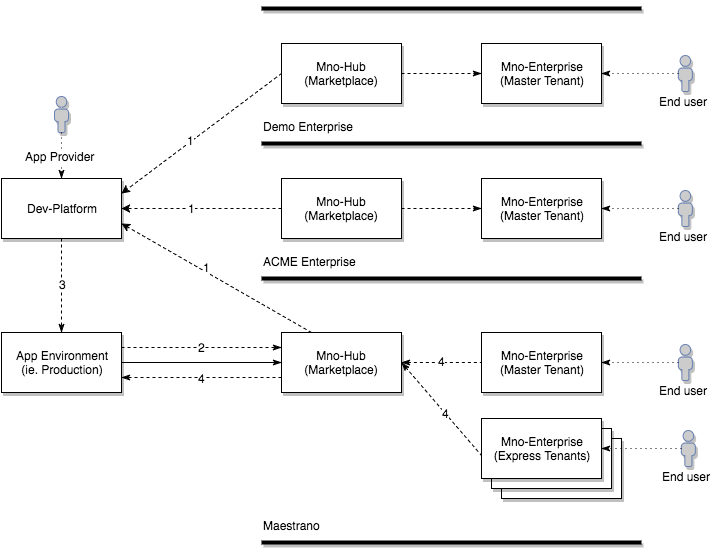
Components interaction overview diagram
2.1 - Marketplace registering on the developer platform
When a new marketplace is started, it automatically register to the developer platform. During the registration, the marketplace provides its components endpoints (Maestrano Hub, Impac!, Connec! & Nex!) and the developer platform will return the credentials and certificates for this marketplace.
2.2 - Create an app on the developer platform and publish it on a marketplace
Create your app and its environments on the developer platform. You will have to fill information about your app (endpoints and paths). For every path, it is possible to use `%{marketplace}` and `%{environment}` variable in the string, this can be used by the app to configure dynamic multi-marketplaces endpoints (eg. "/maestrano/saml/init?marketplace=%{marketplace}" or "/%{marketplace}/saml/init").
Once your app is created and configured, open a ticket on the developer desk to have access to our integration sandbox.
You will then be able to publish an app environment to a marketplace (eg. "My App Production" to "ACME Enterprise"). This will then create (or update) an app on the marketplace, displaying the infos from the associated listing.
2.3 - App automatic configuration endpoint
Your app environment can retrieve the dynamic configuration of the marketplaces it is listed on by calling the endpoint "http://dev-platform.maestrano.com/api/config/v1/marketplaces" and using credentials (Basic Auth) given on the developer platform.
The returned array contains JSON objects using the same format as described here: SDK-free Integration. The only added field is the marketplace nid.
If you use one of our integration SDK, you just need to configure it to use the automatic configuration. The SDKs will then retrieve the app environment auto configuration from the developer platform. Have a look at the SDKs README to understand how the SDK dynamic configuration feature can be configured.
2.4 - SSO from a tenant to an app environment
When an end user start an app instance, it will contact the app "init" and "consume" endpoints. Those endpoints must be multi-marketplace ready.
3 - Getting started
3.1 - Create an account
- Using google or github
- Sign up
- The user will be asked to create a company
3.2 - Invite your team
On the settings page, you can invite members to your company. They will receive an invitation email with a link, and will have to fill a simple form with their informations.